Homeowners often miss the potential of window spaces. You might stare at a bare frame and see nothing but light leakage. That is a mistake. A window is a prime real estate for greenery or collectibles. It is underutilized storage that screams for attention.
Think about the plants you struggle to keep alive. They need sun. They need access to it. A custom windowsill shelf solves that problem. It extends the existing sill. It pushes the planting zone into the brightest part of the room. The plants get what they need. You get more floor space back.
If you hate plants, fine. Use the shelf for ceramics. Display those rare vinyl records. Or stack your favorite coffee mugs. The natural light from the window will highlight every detail. It turns a functional hole in the wall into a showcase.
“Adding a windowsill shelf provides plants with perfect access to sunlight… while giving you some additional places to put them.”
You can mount these shelves on the inside or outside of your home. Interior installs are easier for beginners. Exterior builds require more weatherproofing but look stunning on a cottage facade. Either way, you need basic tools and wood. That is it.
This guide focuses on the interior expansion. We are replacing a standard sill with an extended shelf. This increases the footprint. It gives your ferns or succulents breathing room.
Зміст
Tools and Materials You Will Need
Before you cut anything, gather your supplies. You do not need a pro-grade workshop. Just the basics.
- Wood : Use a stable lumber like pine or oak. Pine is cheaper and easier to cut. Oak lasts longer but costs more. Ensure the wood is dry to prevent warping.
- Measuring Tape : Precision matters here. Measure the window width exactly.
- Circular Saw or Hand Saw : For cutting the wood to size.
- Drill and Bits : To pilot holes and drive screws.
- Sandpaper : Grit 120 and 220. Smooth out rough edges.
- Wood Glue : Adds strength to joints.
- Level : Crucial for a straight install.
- Caulk : For sealing gaps between the wood and window frame.
- Paint or Stain : Optional, but recommended for durability and style.
Measuring and Cutting the Wood
Start by measuring the width of your existing windowsill. Add two inches to that measurement. This extension creates the overhang. You want at least one inch of support on each side of the window frame.
Cut your main board to this length. If you want a deeper shelf, cut the wood to your desired depth. Standard sills are often two inches deep. A custom shelf can be six or eight inches. Go wider if you have large pots.
Next, cut the front and back supports. These pieces will sit behind the main board. They provide structural integrity. They prevent the shelf from sagging under the weight of soil and pots.
Installing the Shelf
Position the shelf over the existing windowsill. Use the level to ensure it is perfectly horizontal. A crooked shelf looks amateurish. It also makes pots slide off.
Mark the pilot holes through the back supports. Drill your holes. Apply wood glue to the joints. Screw the assembly
A windowsill shelf isn’t just decorative. It’s a functional addition that turns dead space into storage for plants, jars, or collectibles. You can install it on the interior or exterior, but interior builds are far more common for DIYers. The project adds character without eating up floor space.
It takes about two hours. You don’t need a massive workshop. Just a few hand tools and some pine stock.
Remove Existing Trim
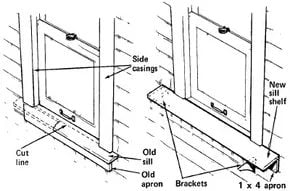
The build process starts with destruction. You need to fit the new shelf into the existing window’s trimwork. Most windows require removing the apron below the sill and the side casing.
Grab your pry bar. Work slowly. You want to remove the trim, not break it. If you damage the wood, you’ll spend more time repairing it than building the shelf.
Once the apron is off, remove the windowsill itself. This usually means taking out the side jamb trim too. Set these pieces aside. They might be reusable, or you can use them as guides for measuring.
Cut the Existing Sill
Measure the exposed window sill. You need to cut the inside edge—the side facing the room—so it sits flush with the wall surface.
Mark your line. Use a handsaw or power saw to make the cut. Plane the edge smooth. It needs to be square to accept the new shelf properly.
Slide the sill back into place. Check the fit. If it’s loose, you might need to shim it, but usually, a clean cut and careful planing is enough.
Build the Shelf Board
The shelf itself is simple. Use 1×6, 1×8, 1×10, or 1×12 pine stock. Pine is soft, easy to cut, and takes stain or paint well.
Decide on the width. You can go up to 12 inches wide. The length should match the window width or extend beyond it.
If you extend past the window, the shelf must span a wall stud on each side. This is non-negotiable. The brackets will anchor to these studs. Without stud support, the shelf will sag under the weight of heavy pots or books.
Cut the shelf to size. Square ends are standard. Want a more custom look? Use a saber saw to round or angle the edges.
Place the board against the sill and wall. Check for gaps. Plane any rough spots. It should sit tight.
Secure the Shelf
Now for the joinery. You need to butt the window frame’s side pieces tightly against the top of the new shelf. Trim them if necessary.
Apply carpenter’s glue to the bottom ends of these side pieces and the edge of the shelf where it meets the sill.
Position the shelf. Drive 6-penny finishing nails up through the shelf and into the ends of the side pieces. This locks the shelf in place against the window frame.
Countersink the nails. You don’t want nail heads poking through the wood later.
Install Brackets and Apron
Brackets provide the real structural support. Attach them solidly to the wall studs on both sides. Then secure them to the shelf using 10-penny finishing nails.
Countersink again.
Next, cut a new apron from 1×4 pine stock. This piece goes beneath the shelf. It serves two purposes: structural support and aesthetics. It hides the rough opening left by the removed trim.
Nail the 1×4 in place with 10-penny finishing nails. Countersink.
Finish and Maintain
Finish the shelf and the new apron to match the existing window trim. Paint or stain. Let it dry completely.
Once installed, you have a sturdy ledge. It’s ready for soil-filled pots or ceramic canisters.
Want to expand? Build a set of matching shelves for a dedicated plant corner. See the next section for details on scaling the project.
Related Window Projects
- How to Repair Windows: Fix common issues like stuck sashes or broken locks to keep your window in good working order.
- How to Clean Windows: Maintain clear glass panes with methods that leave no streaks.
- Kitchen Window Treatments: Choose coverings that fit the kitchen’s warm atmosphere without blocking light.
How to Build Plant Shelves for a Window
Why Plant Shelves Need Space From Glass
Direct contact between glass and foliage is a slow killer. In winter, condensation forms, then freezes. The roots suffocate or rot. It’s not romantic. It’s just bad biology.
So you build shelves that hang just off the pane.
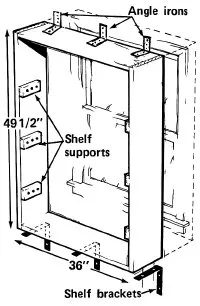
This project targets a 36-inch wide by 48-inch tall window. You can scale it. Measure the outside edge of your frame. Leave a few inches of gap. Airflow matters. Plants need it.
What You’ll Need
Gather your gear before you cut. A mistake here costs time.
Tools:
– Measuring rule
– Pencil
– Handsaw or power saw
– Carpenter’s square
– Drill
– Screwdriver
– Hammer
– Paintbrush
Materials:
– 1 × 8 pine (sides, top, bottom)
– 1 × 6 pine (shelves)
– 1 × 2 pine (supports)
– Carpenter’s glue
– #8 flathead wood screws
– 3-penny finishing nails
– Sandpaper
– Stain or paint
– Shelf brackets with screws
– Angle irons with screws
Time: 2–4 hours. Plus drying time. Don’t rush the finish.
Cutting the Frame
Start with the skeleton. You need two 49 1/2-inch pieces of 1 × 8 for the sides. Two 36-inch pieces of 1 × 8 for the top and bottom.
Cut three 36-inch pieces of 1 × 6 for the shelves.
Then the supports. Cut six 5 1/2-inch pieces of 1 × 2.
Use your carpenter’s square. If your cuts are off by even an eighth of an inch, the corners won’t square up. You’ll be shimming later. Do it right now.
Assembling the Box
Lay the boards on a flat surface. On edge. Top and bottom butt between the side boards.
Apply a bead of carpenter’s glue to each joint. Join them.
Now, the screws. Drill three pilot holes at each corner. Use #8 flathead wood screws. Secure each corner. The glue holds the grain. The screws hold the structure.
Positioning the Supports
Look at the inside face of one side piece. Mark three spots.
Measure from the bottom of the frame.
– 8 inches
– 16 inches
– 32 inches
These spots dictate shelf height. Adjust them if you have tall ferns or short succulents. Just keep the spacing logical. Gravity doesn’t care about your design aesthetic.
Place the 1 × 2 supports over these marks. Flush with the edges.
Drive three 3-penny finishing nails through the support into the side piece. Repeat for the other side. Measure and mark carefully. Asymmetry looks sloppy.
Finishing Touches
Stain or paint the frame and shelves now. Let them dry completely. Manufacturer instructions are not suggestions. Wet paint on wood traps moisture. It blisters.
Once dry, assemble the whole thing.
Mounting to the Wall
Find the studs. You need them at the sides and center of the window.
Position a shelf bracket against each stud. Place it 3/4 inch below the window frame.
Mark the screw holes. Drill pilot holes. Fasten the brackets to the studs.
Set the frame onto the brackets. Mark the screw locations under the frame. Drill into the wood. Fasten it down.
Final Safety Check
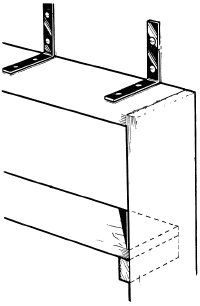
Three angle irons. One at each corner. One in the middle of the top.
Place them on top of the frame. Mark screw holes in the frame and into the wall studs.
Drill pilot holes. Fasten the angle irons.
This keeps the whole unit from tipping. Especially if you put heavy ceramic pots on the top shelf.
The window is now a garden. Or a jungle. Depends on how much water you’re willing to carry.
For more ideas on window-related projects, see:
-
How to Repair Windows: Get the tips and instructions you need to correct common problems and keep your windows in good working order.
-
How to Clean Windows: Dirty windows are a big detraction, so follow your directions to keep your glass panes shiny and clear.
-
Kitchen Window Treatments: The kitchen is often the center of a home, so windows there need a special look. Choose the perfect treatment for a warm and welcoming atmosphere.
How to Build a Window Box
Plants don’t have to live inside. You can take them out, too. If you’re looking for a classic way to display greenery outside, a window box is the answer. It’s simple. It’s effective. And it adds instant curb appeal.
Why Choose a Window Box?
You might wonder which option is better for your space. Shelves hold more plants, sure. But a window box frames the view. It draws the eye up. It feels integrated with the architecture.
“A window box is more than just a planter. It’s a frame for your view.”
Where to Start
First, measure your window. You need to know the width. The box shouldn’t hang too far out. It should sit flush or slightly proud of the siding. Don’t overthink the length. Stick to what fits your specific window frame.
Materials You’ll Need
You don’t need fancy wood. Cedar or redwood resists rot. Pine works if you treat it well. Here’s what you’ll grab:
- 1×6 or 1×8 lumber (cut to length)
- Galvanized screws
- Wood glue
- Exterior-grade primer and paint
- A drill
- A level
- Mounting brackets
How to Build It
Step one is cutting. Cut two side panels to the same height as your desired box. Cut the bottom panel to fit snugly between them. The back panel can be flush with the outer edges or inset. Inset looks cleaner.
Assemble the box. Apply wood glue to the joints. Then drive in your screws. Don’t skip the glue. It adds strength. It keeps the wood tight against the elements.
Drainage Matters
Water has to go somewhere. Potted plants drown without it. Drill holes in the bottom. Use a 1/2-inch spade bit. Space them about six inches apart. More holes mean better drainage. Less standing water means healthier roots.
Painting and Protecting
Paint the box before you install it. Prime the wood first. Two coats of exterior paint work best. This protects the wood from rain and sun. It also matches your trim. Or contrasts it. Your call.
Installation
Use mounting brackets. These screw directly into the window sill or the siding below. Don’t rely on the window frame itself. It can warp. The brackets distribute the weight. They keep the box steady in wind.
“Secure the brackets to solid wood, not just vinyl or aluminum siding.”
Fill the box with potting mix. Plant your flowers or herbs. Water them. Step back. Look at it. It’s done.
Maintenance
You’ll need to water these more than indoor plants. Wind dries them out fast. Check the soil daily in summer. Add fertilizer every few weeks.
Window boxes bring life to any facade. They are practical, cheerful, and surprisingly easy to build yourself. This design uses rot-resistant cedar or redwood. It is sturdy enough for heavy soil and varied plantings. You can build one in about an hour and a half.
Gather Your Tools and Materials
You do not need a full workshop. Just a few basics.
– Measuring rule
– Pencil
– Carpenter’s square
– Handsaw or power saw
– Small mixing dish and stir stick
– Power drill with 11/64-inch, 1/2-inch, and carbide-tipped bits
– Screwdriver
– Hammer
– Safety goggles
The wood choice matters. Use 1×2 and 1×8, 1×10, or 1×12 stock. Redwood or cedar resist moisture better than pine. You will also need:
– Resorcinol glue (waterproof)
– #8 x 1 1/4-inch brass or stainless steel flathead wood screws
– 6-penny brass or stainless steel finishing nails
– Heavy-duty shelf brackets
– #8 x 2-inch brass or stainless steel flathead screws (or 2-inch lag screws with lead masonry anchors for wall mounting)
Measure for a Perfect Fit
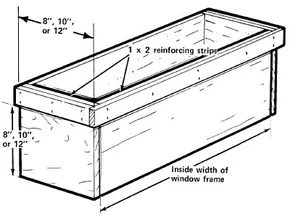
Start by measuring the inside width of your window frame. This determines the box length. If you follow this measurement, the finished box will extend about 1.5 inches past the window on each side. Adjust if you want it narrower.
Use a carpenter’s square to mark three boards to your desired length. Cut them with a saw. For the two side pieces, measure and cut a board as long as the stock width plus 1.5 inches.
Assemble the Box Joints
Fit the pieces together using simple butt joints. The front and back boards butt over the bottom board. Keep all edges flush. Place the side pieces directly over the open ends of the box.
Align the grain. Run the grain of the side pieces the same way as the front and back. The pattern should wrap around the box. This looks better and adds slight structural integrity.
Fasten the box with resorcinol glue and screws. Start by attaching the front and back to the bottom. Then secure the sides. Drill 11/64-inch holes through the face of the board being attached. Do this for the front, back, and side pieces. Do not drill through the bottom board yet.
Space the holes at each end and every 4 inches along the joint line. Set them back about 3/8 inch from the edge. Set the board in place. Mark the screw holes on the edge it is fastening to. Drill starter holes into that edge.
Glue and Screw for Strength
Mix the resorcinol glue exactly as the manufacturer directs. It needs to bond properly. Apply glue to the edge of the board you are attaching to. Set the facing board against the glued edge. Ensure all edges remain flush.
Drive the #8 x 1 1/4-inch screws through the predrilled holes and into the edge board. Brass or stainless steel resists rust in outdoor conditions.
Add Reinforcing Strips
For a stronger window box, add reinforcing strips. Place them across the front and around the sides. Butt the front strip over the cut ends of the two side strips.
Cut strips from 1×2 redwood or cedar. Attach the side strips first. Then attach the front strip. Keep the top edge of the 1x2s flush with the top of the box.
Apply glue to one face of the 1×2. Position it on the box. Nail it firmly with 6-penny brass or stainless steel nails. Space them every 4 inches.
Handle Drainage and Weight
Waterlogging kills plants. Drill weep holes in the bottom if you use heavy-water plants. Drill a series of 1/2-inch holes every 4 inches along the center of the bottom board.
Cover the bottom with gravel before adding soil. This aids drainage further.
Mounting the Box
You need heavy-duty shelf brackets. Use #8 x 2-inch brass or stainless steel flathead screws. Or use 2-inch lag screws with lead masonry anchors if you are screwing into brick or stucco.
Check your wall type. Masonry requires anchors. Wood framing allows direct screwing.
Plant what you like. Herbs? Flowers? Succulents? The box holds it all. Just remember the weight. Soil gets heavy when wet. Ensure your brackets are secure.
A little planning goes a long way. You get a custom fit. You choose the wood. You control the quality.
The window looks finished. The plants have room to breathe. It is done.
mounting the box to the wall
You need heavy-duty shelf brackets for this. They are the only thing that will hold the weight of a full box. Position them to rest against the wall studs. You want them straight down from the window edges. Usually, the center of the window is the sweet spot.
Check your framing. For wide windows, studs might be at 16-inch or 24-inch intervals. Don’t guess. Use a stud finder.
Pick your bracket count wisely. Two brackets work for a short box. If the box is 4 feet long or longer, you need three or more. More support means less sagging later.
hardware and installation
Turn the box upside down. This makes it easier to work on the bottom.
Attach the mounting brackets to the bottom. Use #8 × 1 1/4-inch screws. Brass or stainless steel is best. They resist rust. The vertical legs of the brackets should lie flush against the back of the box. No gaps.
Prop the box up against the wall. Align the bracket legs with the studs.
Secure the vertical legs to the house wall. Use #8 × 2-inch flathead screws. Again, go with brass or stainless steel.
What if your house is brick or concrete block? You can’t hit a stud there.
Use 2-inch lag screws with lead masonry anchors.
Put on your safety goggles. Seriously. Brick dust gets everywhere.
Drill the holes. You need a power drill and a carbide-tipped masonry bit. Drill deep enough for the anchors.
Insert the anchors. Drive the lag screws in flush with the wall surface. Tighten it up.
final touches
Add soil. Add plants.
Step back. Look at the result.
It’s done.
For more ideas on window-related projects, see:
-
How to Repair Windows: Get the tips and instructions you need to correct common problems and keep your windows in good working order.
-
How to Clean Windows: Dirty windows are a big detraction, so follow these directions to keep your glass panes shiny and clear.
-
Kitchen Window Treatments: The kitchen is often the center of a home, so windows there need a special look. Choose the perfect treatment for a warm and welcoming atmosphere.