Start with the basics. You can’t fix what you don’t understand, and most light switch failures are just simple breaks in the circuit. Before you touch a single screw, you need to know how power actually moves through your walls. It is not magic. It is physics. And it is dangerous if you get it wrong.
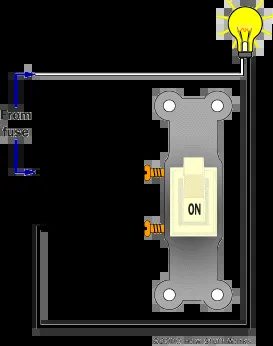
The simplest setup involves a standard switch controlling a single light. Here is the flow.
The black wire is hot. It carries the 120-volt alternating current from your breaker panel to the switch. The white wire is neutral. It completes the loop, carrying current back to the panel. Grounding is separate. Do not mix them up.
When you flip the switch, you are doing one thing only: opening or closing a gap. The switch itself does not generate power. It just stops or starts the flow. When the switch is on, the circuit is closed. Current travels along the black wire, through the switch terminals, into the light fixture, and out through the white wire. The circuit is complete. The light turns on.
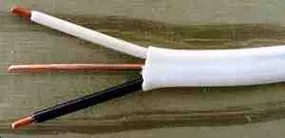
Electricians rarely use individual wires run through conduit for standard home wiring. They use Romex. This is the common name for non-metallic sheathed cable. You will see it everywhere in residential construction. It bundles the hot, neutral, and ground wires together inside a flexible plastic jacket.
“The switch simply opens (off) or closes (on) the connection between the two terminals.”
This bundling makes installation faster. It also reduces clutter in your walls. But it means you need to identify the wires correctly before you start cutting or stripping. The white jacket usually contains the white (neutral), black (hot), and bare copper (ground) wires inside.
If you are planning to replace a switch, or if you are wiring a new fixture from scratch, this basic configuration is your foundation. Get this wrong, and you risk a short circuit. You risk tripping breakers. You risk starting a fire.
Stay safe. Turn off the power at the breaker before you touch anything. Test the wires with a non-contact voltage tester before you assume they are dead. Electricity does not care about your intentions. It only cares about the path of least resistance.
Understanding this simple loop is the first step. Once you grasp how current moves from hot to neutral through the load (the light), you can begin to see how more complex circuits work. But that comes later. For now, just respect the black wire. It is always live until you prove otherwise.
Зміст
The Anatomy of Standard Romex
That white jacket you see isn’t just cosmetic. It’s a tough plastic sheath holding everything together. Strip it back, and you’ll find three distinct players.
Two of them are insulated. You’ve got the black wire and the white wire. They carry the current. The black is the hot, bringing power in. The white is the neutral, sending it back.
But there’s a third one.
It’s bare copper. No insulation. This is your grounding wire. It’s the safety net. If something goes wrong inside an appliance or a fault occurs in the wall, this wire gives the electricity a path to the earth instead of through your body.
For most standard home projects, you are looking at either 12-gauge or 14-gauge cable. That “gauge” number refers to the thickness of the copper inside. Thicker wire. Less resistance. Handles more amps. Thinner wire. Higher resistance. Lower capacity.
Why Wire Gauge Matters for Your Safety
Choosing the right gauge isn’t just about fitting the wire in the box. It’s about preventing fires.
If you use 14-gauge wire on a circuit protected by a 20-amp breaker, you’re asking for trouble. The breaker won’t trip in time to save the wire from melting. That’s why building codes are strict.
The rule of thumb:
– 14-gauge wire is typically paired with a 15-amp breaker. This is common for lighting circuits and older homes.
– 12-gauge wire is required for 20-amp circuits. This is the standard for kitchen outlets, garage power, and most modern general-purpose outlets.
Using 12-gauge on a 15-amp circuit is perfectly fine and actually provides a bit of extra safety margin. Never go the other way. Never use 14-gauge on a 20-amp circuit.
Tools and Materials for the Job
You don’t need a massive tool shed to work with this cable. But you do need the right basics.
Essential tools:
– Wire strippers: Get a quality pair. The auto-stripping kind saves time but cheap ones can nick the copper. Nicks create weak points that can break later.
– Cable cutter or utility knife: For slicing through that thick white sheath without damaging the inner wires.
– Screwdrivers: Both flathead and Phillips. For securing wires to terminals.
– Voltage tester: Non-negotiable. Verify the power is off before you touch anything.
Materials to keep handy:
– Wire nuts: The colored caps that twist the wires together. Make sure you buy enough.
– Electrical tape: For extra insulation on connections, though modern wire nuts are usually sufficient if tightened properly.
– Pliers: Needle-nose pliers help when you need to bend wires into hooks for screw terminals.
Safety First: The Non-Negotiables
Electrical work is one of those DIY tasks where a mistake can be lethal. Not inconvenient. Lethal.
Always turn off the breaker. Then test it. Again.
Your voltage tester needs to be working properly. Test it on a known live source first to confirm it’s beeping.