Most people grab a ruler without thinking twice. It’s that flat strip of wood, plastic, or metal sitting on a desk. You use it to measure a shelf width or to guide a pencil for a straight line. But when you’re in the middle of a renovation and need to cut a board to exactly 7 and 1/8 inches? Guessing won’t cut it. You need to know how to read a ruler correctly.
If you can’t decode the marks, your custom cabinet will have gaps. Your shelves will be uneven. Here is the practical breakdown of what those lines actually mean and how to use them for your next home project.
Зміст
Imperial vs. Metric: Which System Are You Using?
First, figure out what you are holding. The world is split on measurement, and mixing them up leads to costly mistakes.
In the United States, the default is the imperial system. You’ll find 12-inch rulers everywhere. These measure distance in inches and fractions thereof. The U.S., Liberia, and Myanmar are the only countries still using this system by default for everyday tasks.
Most of the rest of the planet uses the metric system. This is based on units of millimeters, centimeters, and meters. It’s simpler math. Ten millimeters make a centimeter. A thousand millimeters make a meter.
If you are in the United Kingdom, you are likely juggling both. Many English rulers have inches on one edge and centimeters on the other. Knowing which side to trust before you make a cut is step one.
Decoding the 12-Inch Ruler
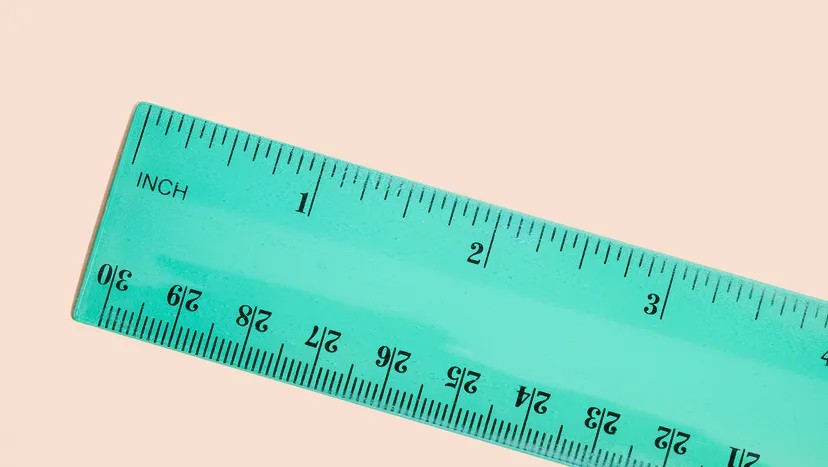
Reading an inch ruler isn’t rocket science, but the fractions can be confusing if you haven’t looked closely. The markings aren’t random. They follow a hierarchy of length.
1. Aligning the Object
Start by placing the object you need to measure against the ruler. Crucially, align the end of the object with the zero mark, not the physical edge of the ruler. Most rulers have a small gap before the first inch mark. If you start from the physical edge, your measurement will be off by that gap. Always start at the “0” line.
2. Identifying the Inches
The longest lines on the ruler represent whole inches. These are the only lines that are usually numbered. If your object’s edge lands directly on a long line, the measurement is simple. It hits the number printed there.
3. Reading the Fractions
Things get tricky when the object falls between two long inch lines. This is where you count fractions. The lines are standardized:
- Half-Inch Marks: These are the second-longest lines. They sit exactly in the middle of every inch. If you are measuring 1 inch, the line right in the middle is 1-1/2 inches.
- Quarter-Inch Marks: Between an inch line and a half-inch line, there is a shorter line. This represents a quarter (1/4). So, between 1 inch and 1-1/2 inches, you have 1-1/4.
- Eighth-Inch Marks: Often, there are even shorter lines between the quarter marks. These represent eighths (1/8).
- Sixteenth-Inch Marks: The smallest lines you will see on a standard ruler represent 1/16 of an inch. These are used for fine-tuning cabinetry or trim work.
It takes practice to see the 1/16 marks quickly. Start by counting the half-inches, then the quarters, then the eighths. The smallest line is just a subdivision of the next largest mark.
Reading a Metric Ruler
If you are buying materials from an international supplier or working with metric tools, you are dealing with centimeters and millimeters. The logic is similar to the inch ruler, but the math is base-10.
1. Find the Zero
Again, start at the zero mark, often labeled “0 cm.” Do not start at the physical edge of the ruler.
2. Identify the Centimeters
The longest lines are centimeter marks. They are numbered. The space between each number is one centimeter.
3. Count the Millimeters
The shortest lines represent millimeters. There are 10 millimeters in one centimeter. This makes counting linear. You don’t have to think in halves or quarters. You just count up.
4. Use the Half-Centimeter Guide
Look closely at the millimeter lines. The line in the middle