Room air conditioners, commonly referred to as window units, operate on the same fundamental principles as central air systems. They compress refrigerant, transfer heat, and blow cool air. The main difference? They are self-contained and significantly smaller. This independence comes at a cost. Operating a single window unit can be more expensive per hour than a central system, especially if you are trying to cool multiple rooms. Depending on the BTU rating and placement, these units might cool just the immediate room or leak cool air into adjoining spaces if not sealed properly.
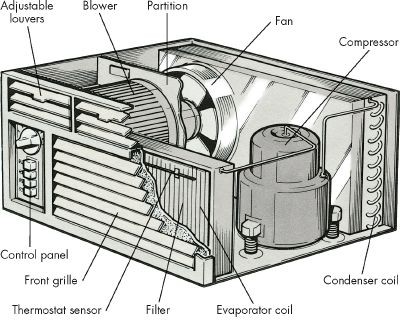
Inside the metal casing, you will find a specific stack of components. Sandwiched between the condenser and evaporator coils sit the compressor, two fans, a motor, and the thermostat controls. The compressor pumps refrigerant. The fans move air across the coils. The thermostat monitors the temperature. It is a compact but busy machine.
Dirt is the biggest enemy of window air conditioners.
When dust and debris accumulate, efficiency drops. The evaporator coil loses its ability to absorb heat effectively. The fan that blows out cool air can get blocked by matted filters. Drain ports clog, leading to water leaks inside your home. This buildup forces the motor to work harder, increasing energy bills and shortening the lifespan of the unit. Regular cleaning is not optional. It is maintenance.
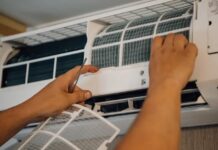
Start by turning off the power. Remove the front grille. Pull out the filters. Wash them with warm water and mild detergent. Let them dry completely before reinstalling. Vacuum the coils gently. Check the drain holes. Clear any blockages. This simple process restores airflow and cooling power.
Do not ignore the exterior. Debris from outside can get sucked into the intake. Leaves. Twigs. Dust bunnies. All of it blocks the fins. Use a fin comb to straighten any bent fins. Straight fins allow air to pass through evenly. Bent fins create turbulence and reduce efficiency.
Consider the installation angle. A slight tilt toward the outside prevents water from pooling inside. Check the seal around the window frame. Gaps let hot air in. They also let cool air escape. Use weather stripping or foam tape to seal the edges. This simple fix can lower your electricity usage significantly.
The compressor is the heart of the unit. It generates heat. If it overheats, the system shuts down. Ensure there is adequate ventilation around the back. Do not block the exhaust side. Keep the area clear of vegetation and obstructions. Airflow is critical for heat exchange.
Filters should be cleaned every two weeks during peak usage. More often if you have pets or live in a dusty area. Clogged filters restrict airflow. This makes the fan strain. It makes the compressor work harder. The result is higher bills and a noisy unit.
Check the electrical connection. Loose wires can cause arcing. Arcing leads to fire hazards. If you smell burning plastic, turn the unit off immediately. Do not use it until a professional inspects the wiring. Safety first.
Water management is often overlooked. If the unit leaks, it can damage your window sill and floor. Ensure the drain port is clear. Use a small wire or pipe cleaner to poke through the hole. Remove any sludge. Test the drainage by pouring a little water into the pan. Watch it flow out. If it stays, clear the blockage.
Cooling
Зміст
The Safety Rule You Can’t Skip
Capacitors are the silent killers in your window unit. They sit behind the control panel, near the fan, and they hold an electrical charge even after you’ve yanked the plug. You don’t want to find that out the hard way.
Unplug the unit. Then, check the manual to see how to discharge the capacitors safely. If you don’t know how, or if the manual is missing, call a pro. A severe shock is not a DIY experience worth having.
Once you’re sure the power is dead, you can tackle the minor repairs. The major components—the compressor, the motor, the coils—are sealed. They stay sealed. If one of those fails, it’s time to call a technician. You can save on the service call fee, though, by removing the unit from the window and driving it to the shop yourself.
Winter Prep for Your AC
Don’t leave the unit exposed to the elements all winter. It might rust. It might break. You have two choices.
- Remove and store it. Take it out. Put it in the garage. Keep it dry.
- Cover it. Use a commercial cover or heavy plastic sheeting. Tape it down with duct tape. Make sure it’s secure. Wind will tear loose plastic right off.
Why Is My Window AC Not Cooling?
It’s ninety degrees outside. Your unit is blowing hot air. You don’t have time for a service appointment that comes next week. Look at the problem. Match it to the solution. Do it yourself.
The Unit Won’t Turn On
First, check the basics. Is it plugged in? Is the outlet live? Check the main entrance panel. A tripped breaker or a blown fuse is the most common culprit. Restore the circuit.
If the power is good, the motor might have overloaded. These units have safety shutoffs. Wait thirty minutes. Press the reset button. If it trips again, you have a bigger problem.
Check the switch. Look for burns on the terminals or insulation. If you see blackening, replace the switch. If it looks clean but the unit still won’t run, call a pro.
Fuses Keep Blowing
If you’re blowing fuses just to run the AC, you’re on the wrong circuit. Plug it into a different outlet. One that isn’t sharing power with your fridge or microwave.
If it’s on its own circuit and the fuses still blow, your voltage might be too low. Call the power company or an electrician.
Cooling Is Inadequate
Start simple. Lower the thermostat setting by five degrees. Sometimes it’s just set too high.
Next, look at the filter. If it’s dirty, clean it or replace it. A clogged filter chokes the airflow.
Check the coils. Dirt and dust coat them, insulating them from the air. Clean them. Make sure the outside of the unit isn’t blocked by a bush, a wall, or debris. The condenser needs to breathe.
If the coils are clean, the filter is fresh, and the airflow is clear, but it’s still warm, the problem is internal. The motor could be faulty. The compressor could be shot. There could be a coolant leak. These require a professional.
The Fan Runs, But No Cold Air
The fan is spinning. You can feel the breeze. But it’s not cold.
Lower the thermostat setting again. Just in case.
Test the thermostat. It might be faulty. Replace it. Or call a pro.
Check the coils. If they’re dirty, they won’t absorb heat. Clean them.
If the coils are clean and the thermostat is good, the motor or compressor is likely failing. Call a technician.
The Fan Doesn’t Run
The unit cools, but there’s no air movement.
Check the control switch. Reset it. Try different settings.
Look at the fan blades. They might be clogged with dust and lint. Clean them. Tighten them.
Are the blades bent? Straighten them. A bent blade creates vibration and noise. It also reduces efficiency.
If the blades are straight and clean, the fan motor is probably dead. Replace it. Or call a pro.
The Unit Cycles On and Off Repeatedly
Short cycling. The unit starts, runs for a minute, stops, then starts again.
This is usually airflow related. Clean the coils.
Clean the filter.
If it’s still short cycling, you have a deeper issue. But start with the easy stuff. Clean the parts you can reach.
You can fix a lot of these problems yourself. Filters. Coils. Switches. The rest requires skills and tools you probably don’t have. And safety gear you definitely should.
For more on keeping your home cool, look into central air repair, major appliance fixes, or thermostat maintenance. Sometimes the problem isn’t the AC at all.
Routine Maintenance for Filters, Coils, and Power Components
Skipping maintenance is how a functional room air conditioner turns into a noisy, inefficient paperweight. You don’t need to be an HVAC technician to keep the basic components running. It starts with the filter, the power cord, and the coils. Do these things at the start of the cooling season and once a month thereafter. If you live in a dusty neighborhood, do it more often. Dust is the enemy of airflow and efficiency.
Cleaning and Replacing the Air Filter
The filter is the first line of defense. Remove the front grille. Pull out the filter. Most room units use a sponge-rubber style filter that is washable. Mix mild household detergent with water. Scrub the filter. Rinse it thoroughly. Let it dry completely before putting it back. A wet filter breeds mold and restricts airflow.
Some units use disposable filters, similar to furnace filters. If yours does, replace it when it looks dirty. Don’t try to wash a disposable filter. It won’t hold up. A clogged filter forces the motor to work harder. It raises your electric bill. It cools less effectively.
Testing the Power Cord
A worn power cord can fail to supply electricity. This is a safety hazard. To check the cord, you need to remove the control panel. Unscrew the cord terminals. Attach a test wire across the bare lead wires. Set a volt-ohm-milliammeter (VOM) to the RX1 scale. Hook the clips to the prongs of the plug.
If the meter reads zero, the cord is good. If it reads higher than zero, the cord is faulty. Replace it. Do not ignore this. A damaged cord can cause arcing or fire. Use the same gauge wire for replacement. Ensure connections are tight.
Cleaning Evaporator and Condenser Coils
Dirt on the coils insulates them. This prevents heat exchange. Clean the evaporator and condenser coils every month during the season. Use a vacuum cleaner. Remove loose debris. If the fins are bent, use a fin comb. You can buy these at most appliance parts stores. Slide the comb into the spaces between the fins. Be careful. The fins are made of light-gauge aluminum. They bend easily. Damage to the fins reduces surface area. It lowers cooling capacity.
Straightening bent fins with a fin comb can restore airflow and efficiency. Handle with care to avoid further damage.
Diagnosing Switch Issues
The selector switch is behind the control panel. It turns the unit on. If the air conditioner does not run at any setting, and you have confirmed power is reaching the unit, the switch might be bad. Remove the control panel. Locate the switch. Check the terminals for burnt insulation or burn marks. If you see burning, replace the switch.
Use a new switch of the same type. Unscrew the old one. Connect the new one in the same way. If the problem persists after replacing the switch, call a professional. Do not guess. Electrical repairs can be dangerous.
Clearing Clogged Drain Ports
Condensed moisture and water vapor from the evaporator coil funnel through drain ports. The fan blows this moisture against the condenser coil, where it dissipates. If these ports clog with dirt, water leaks from the appliance. Usually, it leaks through the bottom of the grille.
Clean the ports at the start of the season and monthly. Use a short piece of a wire hanger. Or use the blade of a pocketknife. Clear out any debris. Check the condenser side as well. Some models have a drain port along the bottom edge of the cabinet frame. Clean that too. A blocked drain port leads to water damage inside your home.
When to Call a Professional for Motor and Compressor Problems
If the motor or compressor fails, call a professional. These components are complex. They require specialized tools and knowledge. The problem might not be mechanical. It could be the thermostat. Check the thermostat first. If the thermostat is working, the issue is likely internal.
Motor and compressor repairs are best left to certified technicians. Attempting DIY fixes on these high-voltage components can lead to injury or further damage.
The next step is to check the thermostat. It controls the entire system. If the thermostat is faulty, no amount of filter cleaning will help. Learn how to calibrate a thermostat. It is a simple fix that can save you a service call.
Testing and Replacing the Thermostat in a Window Unit
A faulty thermostat is a quick way to kill your cooling efficiency. If the unit isn’t blowing cold air when it should be, the culprit might be sitting right behind the control panel. Replacing it is straightforward, provided you know what you’re looking for. You’ll need a screwdriver, a volt-ohmmeter (or multimeter), and a replacement thermostat that matches the original specs.
Start by removing the grille and control panel. Look closely at the thermostat assembly. It has a small sensing bulb attached via a thin wire. This bulb extends into the evaporator coil area. Its job is simple: sense temperature. The thermostat reads that temperature and decides whether to turn the compressor on or off.
Remove the thermostat carefully. You need to return the sensing bulb to the exact same spot later. If you move it, the readings will be off. Tag the location before you pull anything out. It saves you from guessing later.
Now, test it. Set your volt-ohmmeter to the RX1 scale. Clip the probes to the thermostat terminals. Turn the temperature dial to the coldest setting. Watch the meter. If it reads zero, the thermostat is good. It’s completing the circuit as it should. If the reading is higher than zero, the internal mechanism is broken. Replace it.
When installing the new unit, connect it the same way the old one was. Use the same screws, clips, or metal tabs. Don’t improvise.
There is one major exception. If the thermostat has more than two lead wires connected to it—excluding the sensing bulb wire—stop. Do not try to test or replace it yourself. Complex wiring requires a professional service person. Messing around with multi-wire setups can fry the control board.
Repairing the Room Air Conditioner Fan
The fan keeps the air moving. If it stops, you stop cooling. Noise, vibration, or total failure usually points to loose or dirty blades. Fixing it is mostly about cleaning and tightening. Gather your tools: a vacuum, a soft cloth, a screwdriver or Allen wrench, a long-blade screwdriver, a wrench, 20-weight nondetergent motor oil, and your multimeter.
Open the cabinet. Locate the fan. It’s usually right there, exposed once you’ve taken the front off. Vacuum away the dust bunnies. Wipe it down with the soft cloth. Debris throws the balance off. It creates noise. It wears out bearings. Get it clean.
Check the blade on the motor shaft. Look for looseness at the hub. The blade is held on by a setscrew. Tighten it with your screwdriver or Allen wrench. If your unit has a round vent fan, the setscrew might be hidden. Insert a long-blade screwdriver through the port in the fan housing to reach it.
The fan sits in its housing with bolts. Vibration loosens these over time. Tighten them with a wrench. A loose fan rattles. A tight fan runs smooth.
If the fan has oil ports, lubricate them. Apply several drops of 20-weight nondetergent motor oil. Do this at the start of the cooling season. Do not use all-purpose oil. It gums up the works. Stick to the specific weight recommended by the manufacturer.
Testing the Fan Motor
Cleaning and tightening didn’t fix it? The motor might be dead. Test it before buying a replacement. Set your VOM to the RX1 scale. Disconnect the terminal wires from the terminals. Clip the probes to the bare wires.
Watch the meter. If it reads between roughly 3 and 30 ohms, the motor is functioning properly. The coil is intact. If the reading is zero, the coil is shorted. If it reads extremely high or infinite, the coil is open. In either case, replace the motor.
Removing the motor is a bit more involved. Take off the fan. Disconnect the power wires. Remove the mounting bolts. Install the new motor in reverse order.
There is a hard limit here. If you have to move the condenser coil to get the fan out, stop. Do not try to remove the motor yourself. The refrigerant lines and coil alignment are tricky. Call a professional service person. You risk damaging the sealed system.
Routine Maintenance Matters
Routine maintenance handles most issues with a window air conditioner. Keep the fan clean. Keep the thermostat calibrated. Don’t ignore loose screws. The difference between a unit that lasts ten years and one that dies in two is often just a little bit of attention.
If you’ve tackled the a/c and suddenly your toaster seems broken, you might need to branch out into small appliance repair. But for now, keep that window unit running.