



Building a lamp doesn’t require a degree in electrical engineering or a trip to an expensive boutique. You can start with plywood, some scrap stovepipe, and basic wiring. The result is a sturdy, industrial-style table lamp that fits perfectly on a nightstand or desk.
This isn’t just about illumination. A handmade lamp adds a distinct visual anchor to a room. You control the height, the material, and the finish. Want it modern? Go for high-gloss enamel. Want it rustic? Leave the metal raw. The process is straightforward if you follow the steps carefully.
Зміст
Preparing the Base Structure
You need to create a solid foundation. Cut two discs from plywood. These will serve as the top and bottom of your lamp’s body. Measure your stovepipe sections carefully. The discs should fit snugly inside the pipe. If they’re too loose, the lamp will wobble. If they’re too tight, you’ll crack the wood.
Drill a hole through the bottom disc for the lamp cord. Position it near the edge. You’ll also need a hole for the switch if your socket assembly requires it. Use a drill bit that matches the diameter of your cord and switch components.
Apply construction adhesive to the edges of the discs. This ensures they stay fixed inside the stovepipe. Don’t rely on friction alone. The weight of the shade and bulb will put stress on the joints. Let the glue cure completely before moving on.
Wiring and Assembly
Safety first. Always unplug any power source before working with electrical components. Attach the lamp socket to the top plywood disc. Secure it according to the manufacturer’s instructions. Connect the lamp cord to the socket terminals. Typically, the white wire goes to the silver screw and the black wire to the brass screw.
Thread the lamp cord through the hole in the bottom disc. Pull it up through the stovepipe. Attach a quick-clamp plug to the end of the cord. This makes it easy to change bulbs without reaching behind the lamp.
Test the connection. Plug it in and turn the switch on. If the bulb lights up, you’ve succeeded. If not, check your connections. Loose wires are the most common culprit.
Finishing Touches
Painting transforms the raw materials into a finished piece. Start with a primer. This helps the paint adhere to the metal and wood. Use a high-gloss enamel for a sleek, durable finish. Apply thin coats. Multiple thin layers look better than one thick, drippy one.
Let each coat dry fully. Sand lightly between coats if you see imperfections. This step matters more than you think. A smooth finish reflects light better and looks more professional.
Once the paint is dry, reassemble any parts you removed for painting. Attach the shade. Choose a shade that complements the lamp’s style. A slipcover made from fabric can change the look entirely. This is a low-cost way to update an old lamp.
Why Make Your Own Lamp?
Customization is the main benefit. Store-bought lamps often come in standard sizes and colors. You can’t always find one that fits your space or style. By building your own, you choose every detail. The height matches your sofa. The color matches your walls. The material matches your aesthetic.
You can use almost any container. Wine bottles, mason jars, or even baskets can become lamps.
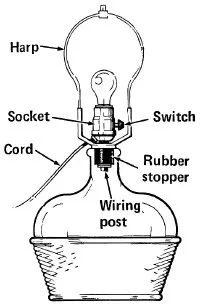

Lighting is non-negotiable in a functional home. You don’t need to spend a fortune at a high-end design store to get nice-looking fixtures. A trip to the hardware store for a basic lamp kit, paired with a random container you already own, is enough to build a custom table lamp. It takes about 15 minutes. Maybe half an hour if you’re fiddling with wires.
Choosing Your Base and Weight
Start with the vessel. A large wine bottle works well, especially if it’s thick glass with some texture. A ribbed jar, a ceramic jug, an old milk can, or even a woven wicker basket all serve as solid candidates.
The physics here are simple. A tall, thin lamp will tip over if it isn’t weighted properly. If your container is opaque, fill the bottom with sand. You can also use bricks or lead weights for serious stability.
Clear containers offer more creative freedom. Fill them with seashells, pebbles, vintage buttons, matchbooks, or dried beans. Layer it. Make it look intentional. Just ensure the bottom is heavy enough to keep the lamp steady when you turn it on.
Selecting the Right Lamp Kit
The material of your base dictates how you wire it.
Option 1: The Plug-In Kit (Easiest)
If you are using a solid container like glass or ceramic, buy a standard electric candlestick conversion kit. These plug directly into the top opening. No drilling required. The cord exits from the top, so you don’t have to modify the container. This is the path of least resistance.
Option 2: The Separate Components (For Open Bases)
If you’re using an open weave basket or something porous, you can’t just plug a cord into the top. You need separate components:
– Socket and cord
– Plug (the clip-on type is easiest)
– Threaded hollow rod
– Brass sheath to hide the rod
This assembly is nearly as simple as a kit. The cord runs through the hollow rod down to the bottom of the basket. You will need to drill a hole in the bottom for the cord to exit.
Wiring a Solid Base (Glass, Ceramic, Pottery)
- Weight it first. Don’t try to wire and then fill. Fill the base with your chosen weight material now.
- Prepare the stopper. The kit comes with rubber stoppers in various sizes. Find the one that fits the neck of your bottle or jar snugly.
- Assemble the post. Thread the nipple of the wiring post into the center of the rubber stopper. Tighten it.
- Attach hardware. Screw the brass washer and locknut onto the base end of the rod. Screw the lamp socket onto the other end (the top).
- Install. Insert the wiring post into the weighted container, socket end up. Push the rubber stopper firmly into the opening. This seals the wiring and holds the lamp upright.
Wiring an Open Basket (Wicker, Rattan)
This method requires drilling and more manual assembly.
- Drill the holes. Drill a hole in the bottom of the basket for the rod and cord. If the basket has a lid, drill a corresponding hole in the lid for the top of the rod. Make the holes large enough for the rod itself at the bottom, and the brass sheath at the top.
- Thread the cord. Feed the plug end of the cord through the hollow rod and pull it through.
- Secure the socket. Attach the socket to the top of the rod using the provided locking screws.
- Cover the rod. Slip the brass sheath over the rod. It should butt up against the socket at the top, hiding the metal threads.
- Reduce stress. Tie a loose knot in the cord near the base of the rod. This prevents the cord from pulling out of the socket if you tug the plug later.
- Set the rod. Place the rod into the basket. Pull the cord out through the bottom hole.
- Adhere. Apply a bead of silicone adhesive around the rod at the bottom of the basket to secure it. Do the same where the rod passes through the lid.
- Weight the basket. Fill the basket with weights. Use material that won’t sift through the weave. Sand or small stones work best.
- Plug it in. Clip the plug to the end of the cord as instructed by the manufacturer.
Final Assembly
Regardless of the method, the finishing steps are identical.
Attach a lamp harp. This is the screw-on wire frame that holds the shade. Screw it onto the socket base. Remove the locknut at the very top of the harp. Place your chosen lamp shade on. Replace the locknut to secure the shade.
Screw in a light bulb. Plug it in.
Turn it on. The light shines through the custom base. It’s functional. It’s unique. It cost you almost nothing but some elbow grease.
The wiring is secure. The weight holds. Now you have a source of light that didn’t exist yesterday. You’ve turned clutter into illumination. What will you build next?

Building the Candy Cane Base
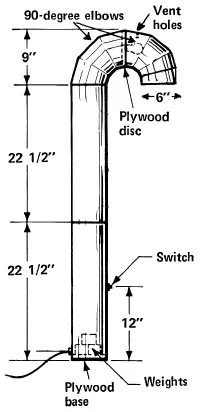
Start by deciding on your color scheme. Shiny red is classic candy cane, but matte black or white works just as well for a sleeker look. The structure relies on six-inch straight stovepipe sections and 90-degree elbow joints. For a 54-inch tall lamp, you need two 24-inch straight pipes and two elbows. That gives you the distinct curve. You will also need 12 feet of lightweight lamp cord.
The foundation is critical. If the base wobbles, the lamp fails. Cut two plywood discs from 3/4-inch scrap wood. They must match the exact diameter of the stovepipe interior. Measure the uncrimped end of a straight pipe and the crimped end of an elbow. Trace these measurements onto the plywood. Cut carefully using a handsaw or saber saw. Do not rush this step. The discs need to fit snugly inside the metal. File the edges with a fine-toothed flat file if they are rough. A tight fit ensures stability.
Securing the Switch and Cord
Before you glue anything down, drill the necessary holes. On the bottom straight pipe, drill a switch hole about 12 inches up from the uncrimped end. Make it just large enough for the switch shank. On the opposite side, drill a cord hole about 1 1/4 inches from the bottom. This placement keeps the switch reachable but out of the way.
Apply a bead of construction adhesive around the edge of your plywood base disc. Slide it into the uncrimped end of the bottom pipe. Adjust it from the top and bottom until it is level and flush. Let it sit. Adhesive needs time to bond. Once dry, you need to add weight. The stovepipe is hollow and light. Use bricks or lead weights inside the base. Spread about 5 pounds of weight to keep the lamp stable. Glue the weights to the plywood using construction adhesive. Be careful not to block the switch hole or the cord hole.
Finishing the Bottom
Trace the stovepipe section onto heavy felt. Cut a circle from the felt. This will back the plywood disc. Spread white glue on the outside face of the plywood. Press the felt into place. Smooth it out to avoid bubbles. Let the glue and adhesive dry completely. This protects the wood and gives the lamp a finished look. It also prevents the lamp from scratching your nightstand.
The Candy Cane Assembly
Now for the fun part. Assemble the pipe sections into a candy cane shape. The “candy cane” portion is created from sections of stovepipe — all you add is wiring. This makes for a bold accent to any room. The lamp is designed for reading or bedside use. It is 6 inches in diameter.
Paint the metal pieces before assembly if you want a uniform finish. Use spray metal primer and high-gloss spray enamel. Let each coat dry fully. Matte finishes work too. If you choose a color other than red, it becomes a unique piece of decor. The stovepipe is inexpensive and easy to work with. It requires basic tools and patience.
Wiring the Lamp
Feed the lamp cord through the holes in the base. Run it up through the bottom pipe, into the elbow, and up through the next straight section. The cord needs to reach the top. Use a wire stripper to remove the insulation from the ends of the cord. Connect the wires to the porcelain lamp socket. Tighten the screws securely. Loose connections cause sparks.
Attach the quick-clamp plug to the other end of the cord. Insert a 40-, 75-, or 100-watt light bulb. Do not exceed the recommended wattage. The stovepipe can get hot. Ensure the socket is secure. Turn on the lamp. The light should shine through the open end of the top pipe. If it does not, check your connections.
Safety First
Stovepipe is designed for high heat. It is safe to use for lighting. However, always ensure the electrical components are secure. Use a grounding plug if available. Keep flammable materials away from the bulb. The lamp is cool to the touch on the outside, but the bulb itself generates heat. Let the bulb cool before moving the lamp.
This DIY project transforms industrial materials into home decor. It is practical and stylish. You can adjust the height by adding more pipe sections. The candy cane shape is eye-catching. It works in a bedroom or a living room. The materials are easy to find. The tools are common. With a little effort, you have a unique lamp. The wiring is the only complex part. Take your time with the connections. A secure electrical setup is non-negotiable. Once the glue is dry and the wires are tight, the lamp is ready. It stands firm. It looks good. It works. What other shapes can you make with pipe?

Wiring the Socket and Preparing the Shade
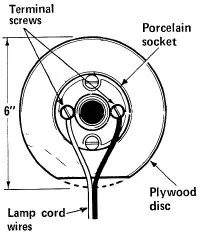
Cut a thin slice from the side of the second plywood disc. This removes material to create a gap where the wires can enter the lamp’s body. Screw a porcelain socket into the center of this disc. Apply construction adhesive along the cut edge, but leave the slice itself clear. Press the disc into the crimped end of the first pipe elbow. Socket side out. Ensure it sits straight. The bulb needs to point directly into the next pipe section.
Let the glue cure. Check the manufacturer’s instructions. Once dry, paint the interior of the bulb end. Matte black spray paint works for a focused bedside beam. Matte white creates a softer, diffused glow. Slide the second elbow over the first. Align them so the socket sits roughly between the curves. Lock the pipe joints firmly in place.
Painting and Venting
Lay down newspaper. Cover the socket opening with masking tape. Spray the inside of the assembled curve with your chosen paint. Cover the plywood and the entire inner pipe surface. Let it dry completely. If needed, apply a second coat.
Remove the tape from the socket. Screw in a bulb. Look inside to see where the bulb sits within the stovepipe. Take it out. Drill three 3/8-inch holes across the top of the pipe, just above where the bulb sits. These vents dissipate heat. Without them, you risk overheating the fixture.
Running the Wire
Thread a 12-foot lightweight lamp cord through the hole drilled in the bottom straight pipe section. Leave 8 to 9 feet of cord outside. Tie a loose knot in the wire. This anchors it against the hole so it doesn’t pull through. The remaining 3 to 4 feet stays inside the lamp for wiring.
Push the wire up the base pipe. Guide it to the drilled switch hole. Near this hole, strip the insulation from the two inner wires for a few inches. Cut only one wire. Strip 1/2 inch of insulation from both ends. Connect these ends to the terminals on the lamp switch. Insert the switch into the pipe hole. Secure it with the lock ring.
Final Assembly
Place the second straight pipe section onto the base. Uncrimped end down. Push hard to join them. Pull the loose wire end up through the pipe. At the top end, separate the two insulated wires for about 6 inches. Strip 1/2 inch of insulation from each. Connect these stripped ends to the screw terminals on the porcelain socket.
Push the curved section onto the straight base. Align the light opening and switch on the same side. Attach a quick-clamp plug to the cord’s free end. Follow the plug’s instructions.
Finishing Touches
Prime the lamp with spray metal primer. Then apply high-gloss spray enamel. Cover the work surface. Mask off the cord and switch. Tape over the bulb opening. Place tape over the vent holes on the inside of the top pipe piece. Apply a light coat of primer. Let it dry fully. Add two or three coats of enamel for a smooth finish. Follow the can’s directions. Let it dry. Remove all tape. Screw in a 40, 75, or 100-watt bulb.
The reading can begin.
If you don’t need a whole new lamp, but would like to revitalize one you already have, visit the next page for instructions on covering a lamp shade.
For more information on lighting and electricity, see:
-
How to Do Home Electrical Repairs: Whether the lights are out, the appliances won’t come on, or a switch won’t work, use this site to learn how to make simple home electrical repairs.
-
How Light Bulbs Work: Sure, it lights up when you connect to a lamp or light fixture, but what goes on inside a light bulb? Find out here!
-
How Electricity Works: Learn how this mysterious force creates power for everything from toasters to Times Square.
How to Cover a Lamp Shade
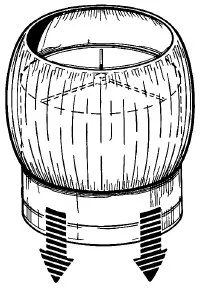

Forget buying expensive new lighting. You can give that drab, dusty lamp shade in the corner of your living room a total personality overhaul. It takes less than an hour. You don’t need to be a couture designer. Just some lightweight fabric, elastic, and a sewing machine. The result? A custom slipcover that drapes in soft, elegant folds. You control the look. You choose the material.
Gather Your Supplies
Before you cut anything, pull these items together. Precision here saves frustration later.
Tools:
* Tape measure
* Sharp scissors
* Straight pins
* Sewing machine
* Steam iron and ironing board
* Safety pin or bodkin (for threading)
Materials:
* A plain lamp shade. No ruffles. No pleats. Smooth surface only.
* Lightweight fabric. Something that flows. Cotton, silk, or a fine linen blend works well.
* Thread that matches your fabric.
* Medium-weight round elastic cord. This is the secret weapon. It creates the shirred effect.
Calculate Fabric Needs
Don’t guess. Measure.
Start with the height. Measure from the bottom rim to the top rim of your shade. Add 3 inches to that number. This is your strip height. If your shade is 12 inches tall, you need 15-inch strips.
Now, check the width. Buy 1 yard of 44- or 45-inch wide fabric. If your shade is taller than 15 inches, add 2 inches of fabric height for every extra inch of shade height.
For the elastic, you need 3 yards of medium-weight round elastic. If the shade has fringe, trim it off gently. Don’t damage the base structure.
Sew the Main Strip
Cut two strips of fabric to your calculated height. Place them right sides together at the selvage edges. Pin them. Sew them with a 1/2-inch seam allowance. Leave a small gap if you need to clip corners, but usually, just sewing straight is fine. Remove pins. Open the pieces up. You now have one long tube of fabric.
Measure for Fullness
This is where the magic happens. Wrap your tape measure around the bottom of the lamp shade. Note that circumference. Multiply it by 1.5. That is your minimum fabric length for the bottom hem.
Example: If the bottom circumference is 50 inches, you need a fabric strip that is 75 inches long.
If your fabric is very thin or slippery, you might want 1.75x or even 2x fullness for a richer look. Cut your strip. Trim from both ends of the fabric bolt to keep the seam centered.
Construct the Hems
Fold the long strip in half at the seam, right sides together. Stitch the loose ends together with a 1/2-inch seam. Now you have a loop.
Turn under 1/2 inch of fabric along each long raw edge. Press it flat. Fold it under another 1/2 inch. Press again. Pin these double-folded hems in place.
Stitch all the way around. Crucial step: Leave a 1-inch opening in each long hem. You will need these holes to thread the elastic later. Backstitch at the start and end of every seam to lock it in.
Thread the Elastic
Cut a piece of round elastic. Make it exactly the same length as the bottom circumference of the shade. Tie one end to a bodkin or a large safety pin.
Insert the pin into the 1-inch opening in the bottom hem. Pull the elastic through the channel. As you pull, the fabric will gather onto the elastic, creating that shirred look. Pull it all the way around until the pin exits the other side of the same opening.
Tie the two ends of the elastic in a square knot. Slide the knot inside the hem so it’s hidden.
Repeat the process for the top hem. Cut elastic to match the top circumference. Thread it through the top hem opening. Tie the knot. Hide it.
Install and Adjust
Remove the old shade from the lamp. Slip your new custom cover over it. Adjust the gathered fabric. Make sure it’s evenly distributed all the way around.
If the cover feels loose, take out the knot inside the hem. Cut the elastic shorter. Retie it. Try again. A snug fit looks best.
Why This Works for DIYers
You aren’t just hiding a bad shade. You’re extending the life of a good one. Why buy a $50 designer shade when you can make one for $10 in fabric?
Can you use LED bulbs with this? Yes. LEDs run cooler, which is safer for fabric. Just ensure the bulb base fits your socket.
Need to change the height? You can modify the design by altering the length of the sections or rearranging parts for different shapes. But for this specific project, the elastic tension does the work.
It’s fast. It’s cheap. And it looks custom-made.


