Most people throw broken heirlooms in the trash. Big mistake.
You can fix them. It takes patience. It requires the right glue. And that requires a steady hand.
If you’re looking for how to repair china, porcelain, and glass, the secret is not speed. It’s preparation. Fast-setting cyanoacrylate glue (superglue) is a trap. It hardens too quickly. You don’t have time to align jagged edges perfectly. You need clarity. You need strength. You need time.
This means clear epoxy resin. A two-part variety. resin and hardener. Just mix what you use in the next five minutes. Epoxy cures waterproof. It holds. But it won’t last if your clamping is sloppy.
Зміст
The equipment you really need
You don’t need a professional shop. You need what’s in your junk drawer.
Tools:
– A small mixing bowl (plastic or metal) and a stirring stick
– Clamping supports (wooden blocks, books or specialized jigs)
– Tape
– A pan filled with sand
– Heavy-duty clothespins
– Modeling clay
– Rubber bands
– Scrap wood and nails or blocks of paraffin wax
Materials:
– Clear epoxy glue (two-component)
– Toothpicks (for precise use)
– Cotton swabs (for cleaning)
– Acetone or nail polish remover (for cleaning uncured epoxy resin)
Time:
Five minutes to mix. Hours to cure. Actual repair time depends on how much of the object is missing.
Why epoxy resin beats superglue
Superglue fogs delicate porcelain. It bubbles. It’s brittle once dry. Epoxy resin fills the gaps. It adheres better than almost anything to non-porous surfaces such as glass and glazed ceramics. It remains slightly flexible, which helps with shock absorption.
But here’s the catch: epoxy resin doesn’t stick to dirt. Or old glue residue. Or glaze. You have to clean the break lines. Use acetone with a Cotton swabs. Scrub. Allow to dry. Nothing else sticks.
Preparing the Clamping System
Do not mix the glue until the clamp is ready. This is non-negotiable. If you’re mixing epoxy and then scramble to find a clamp, you’re wasting glue. It starts curing immediately upon contact.
Think of clamps as a three-dimensional puzzle. You don’t just press two parts together. You are holding them in space as a chemical reaction hardens the bond.
Common Clamping Methods:
-
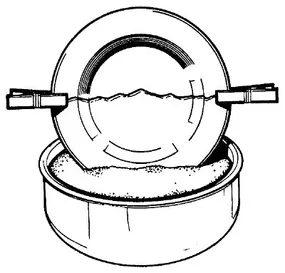
The Sand Pit: Fill a shallow pan with fine sand. Place the broken piece in the sand. Adjust the sand until the piece is exactly at the desired angle. Use small blocks or clay to secure the other pieces in place. This works wonders for large, irregular chips.
-
The Clay Bed: Roll a ball of modeling clay. Flatten into a pancake. Press the broken object into the clay. The clay retains its shape. You can then tape or clamp additional pieces to the clay-backed surface with tape or onto the clay-supported base.
-
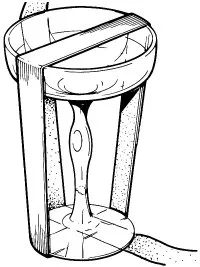
The Wood and Nail Jig: For straight breaks, hammer two nails into scrap wood. Position the break between

Fix the repair when the glue hardens
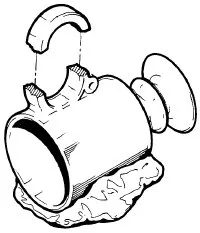
The parts must be held completely in place while the glue hardens. Any change now would destroy this connection. Masking tape is great for mugs with reattached handles or glasses with repaired stems. The surface is gentle and has enough tension to get the job done without leaving a sticky mess later.
Wrap the tape around the object. It’s not just about putting the pieces in there. Use at least two vertical strips around the perimeter of the glass with the stems attached. The goal is to create a cage that holds the joint in place. If you want to attach the handle, you need to wrap tape around the body of the cup and the handle itself to attach them.
The trick is pressure. Maintain even pressure on the band. Pull the tape taut, but be careful not to pull it too hard. Pulling too hard can distort the shape of the glass or break the delicate repair area. You always have to maintain a certain level of tension. This ensures that the patched joints do not change places. If one side is loose, it affects the entire repair.
Check your work before you leave. Squeeze lightly. If the stem wobbles, add another piece of tape. Better to be safe than sorry. Allow the full curing time recommended by the adhesive manufacturer. Rushing this step is the most common reason DIY repairs fail.

Fastening without clamp store
You don’t need expensive vises to glue a shattered plate. Just take a pan and fill it with sand.
Immerse the uncracked part of the plate deep into the sand. Make sure the broken edges are pointing straight up. Gravity does the heavy lifting here. The sand will hold the pieces in place while the glue hardens. If the pieces are large and slippery, use clothespins to press down a little more.
This trick also works on teapots and pitchers. Place them in the sand. Allow the weight of the object to hold the joints.
Plasticine as an Custom Mold
Clay works surprisingly well with irregular shapes. Shape it into lumps to support the repaired cup or glass. Place the broken part facing up. The weight of the ceramic keeps it in the clay.
Place a flat plate on its edge and place it in the drawer. Build a small clay base under the bottom edge. It acts as a prop. Simply. Cheap. Works.
The rubber band method
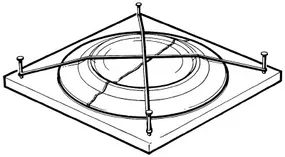
Elastic bands stretch around repaired glasses and cups. Tighten just enough to hold the parts firmly in place. Not too tight. You don’t want to strain the glass or break it further.
For flat objects, try a scrap plate.
Place the repaired object on top of the wood. Mark the points around the perimeter. Remove the item. Drive the nails partially into the wood at these marks. Put the item back in place. Stretch the rubber bands over it from nail to nail. Tension keeps everything in line.
No special tools required. Just household items and a little patience. Glue takes time. And sometimes that time feels like an eternity. But the result? A plate that doesn’t leak and a cup that doesn’t leak. That will do.

Gluing
Start with a clean slate. Wash the shards thoroughly and let them dry out completely. Before you even think about mixing glue, dry-fit the pieces. Lay them out in order on your work surface so you know exactly how the puzzle comes together.
Mix only what you need. In a small dish, combine equal parts resin and hardener according to the manufacturer’s instructions. Apply a thin layer of this epoxy to the raw edges of a broken piece using a toothpick. Press it gently but firmly against the main body of the object. Wipe away any excess glue with a cotton swab dampened with acetone or nail polish remover.
Work from the inside out if you have many fragments. Apply glue and clean up excess piece by piece. Clamp the repaired object securely once you are confident in the assembly. Let the epoxy cure fully—usually around a week for maximum strength. Do not remove the clamps until that time is up.
Rebuilding
Shattered plates or platters are harder to fix. If you have an intact matching piece, use it to create a mold. Heat paraffin in a double boiler until it is soft or just barely melted. Lightly oil the bottom of the good object and pack the softened paraffin over it. Alternatively, set the object bottom-up in a deep pan and pour melted paraffin over it to cover the base completely. Let the wax set, then remove the object.
Glue the broken pieces inside this wax mold. The wax holds them at the correct angle. Start from the center and work your way out and up. You can assemble the object in stages if needed. Let the epoxy cure completely before taking the piece out of the mold.
Next Steps
We will cover how to make your own brass, silver, and copper cleaner in the next section.
For more DIY kitchen improvement ideas, check out these resources:
- See our article on How to Design a Kitchen for a full renovation.
- Browse A Guide to Kitchen Remodeling Materials for shopping ideas.
- Read How to Build Kitchen Improvements for enhancement suggestions.